Do not put the power plug into the wall socket before the device is
mounted or placed correctly.
Observe the minimum distances mentioned in this instruction manual
when installing/positioning the device.
Never block the space between the device and the wall.
Warning
WARNING
Do not install/position the device:
behind a door or by an open window, where rain could get in;
too closely to large objects or under a shelf, cupboard, curtains,
or similar. The air around this device must be able to circulate
freely.
Warning
WARNING
Make sure that you always use attachment materials that are suitable
for the surface you are working with, if applicable; consult an expert if
required.
Warning
WARNING
The wall to which the device is secured and walls within 1 meter of
the device must not be made of flammable materials. Materials must be
resistant to temperatures of at least 200 °C without burning, melting,
deforming, or bursting into flames. Check regularly to ensure that the wall
and ceiling are not overheating.
1.
Place the device on a non-flammable and solid wall.
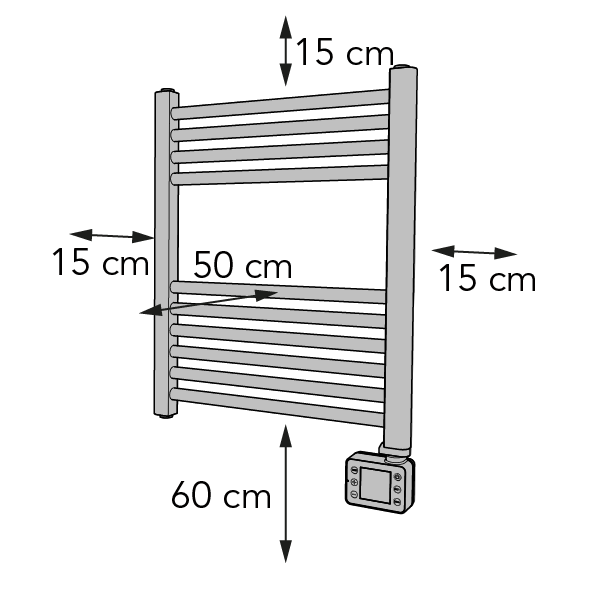
Figure 1.
2.
Place the device with a minimum distance (Figure 1)
of:
15 cm from the ceiling;
15 cm from the side walls;
60 cm from the floor;
50 cm clearance on the front side.
3.
Do not mount the device:
immediately below a socket outlet;
on a ceiling or roof.
4.
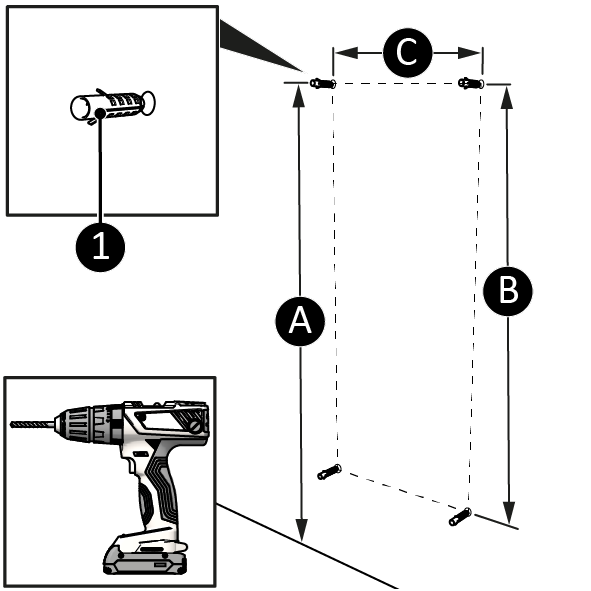
Drill two top holes for the dowels with 392 mm horizontal distance
between the holes (Figure 2, pos. C). Use the distances from the list below to ensure a distance
to the floor of at least 60 cm below the unit (Figure 2, pos. A).
Sani Bathroom Radiator 400: 1110 mm;
Sani Bathroom Radiator 600: 1310 mm;
Sani Bathroom Radiator 800: 1510 mm;
Sani Bathroom Radiator 1000: 1710 mm;
Figure 2.
5.
Drill two bottom holes for the wall plus with 392 mm horizontal
distance between the holes (Figure 2, pos. C). The vertical distance between the bottom and top holes is
approximately (Figure 2, pos. B):
Sani Bathroom Radiator 400: 440 mm;
Sani Bathroom Radiator 600: 640 mm;
Sani Bathroom Radiator 800: 840 mm;
Sani Bathroom Radiator 1000: 1040 mm;
6.
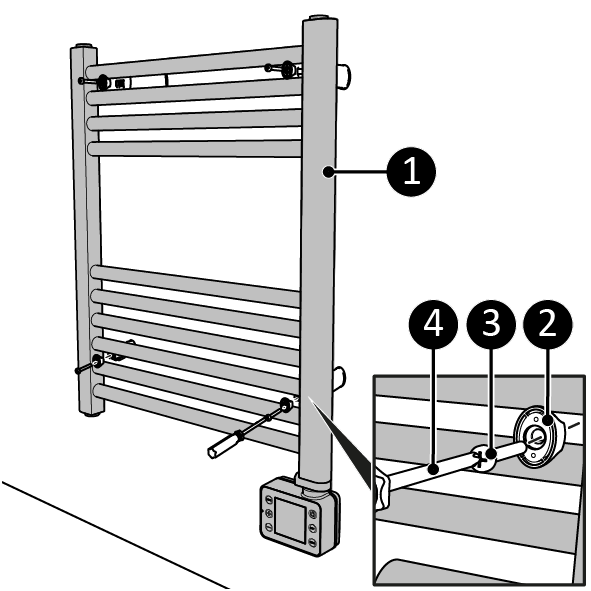
Place the wall plugs and provided rings (Figure 3, pos. 1).
Figure 3.
7.
Screw the four outer wall brackets with self-tapping screws (Figure 3, pos. 2) and spacer rings (Figure 3, pos. 1) into the four plugs.
8.
Slide the square nuts into the designated slots of the inner wall
brackets.
9.
Attach the four inner wall brackets (Figure 3, pos. 3) to the outer wall brackets with small screws (Figure 3, pos. 4) using a Phillips screwdriver.
10.
Place the device (Figure 4, pos. 1) over the wall brackets.
Figure 4.
11.
Screw and tighten the device with four large screws (Figure 4, pos. 3) to the wall bracket (Figure 4, pos. 2) using a Phillips screwdriver (Figure 4, pos. 4).